Appearance
Manage Products
In this document, you’ll learn how to create new product, edit different fields and areas in a product, and more.
Create a New Product
To create a new product:
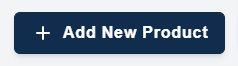
- Go to the Products page.
- Click on the Add New Product button at the top left.
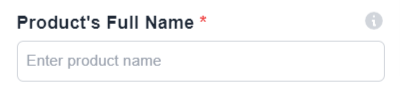
It will open a new form with different sections. The only mandatory field is the Product's Full Name
which is inside General Tab.
General Information Section
- Enter the required field i.e.
Name
.
- Optionally enter the rest of the general information fields like size, Color, Mfg Date, Exp. Date, Description, Long Description etc.
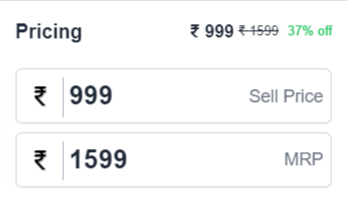
Pricing
Enter the MRP and Discounted Price, if both fields are empty then the product will not display on the storefront.
If Discounted Price which is Sell Price is less then MRP then it will show you the percent of discount with the green letters as shown below
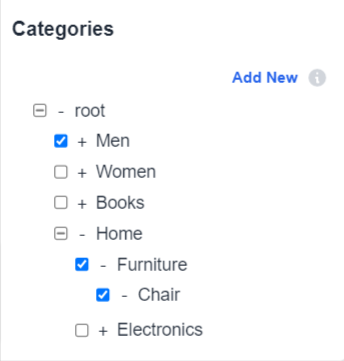
Assign Category
Assigning of category to the product is very easy.
- If you have added categories, the categories will show on Categories section
- Categories will display as a tree structure with multi level children
- Click on the +/- icon to open or close the children section
- Check the category you want to assign the product
- Select multiple categories with just a simple clicks
- IF you have not added any category then click on "Add New" button
Assign Tags
Tag section allows you to add ribons and filter your products.
- Multiple tags that you want to add as a ribbon on the product is much simple.
- All you need to do is select multiple tags from the Product Tags dropdown, selected values will gonna show on the top of the selected box.
- You can remove the tag by clicking on the "x" icon next to the selected tag name.

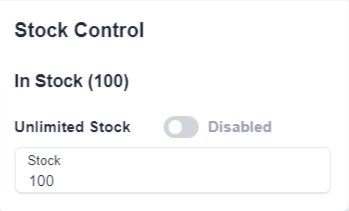
Inventory
Control the stock here just by assigning the instock count.
In case you have unlimited stock then you can just toggle the unlimited stock option true.
Shipping Section
This section includes optional fields that are used for shipping and customs.

Thumbnail Section
INFO
You can set only one image as product thumbnail. By default the first image is the thumbnail of the product.
To set a thumbnail:
- Click on Upload Image dashed box.
- Or drag-and-drop an image in the dashed box.
- The green ticked image is the thumbnail.
- By default the first image will assign to the green tick.
- If you want to change the thumbnail among the other uploaded images, all you need to do is just hover on the image you want to set as thumbnail, you will get to see a tick icon on the top left corner, just click on that button, It's background color will change into green and the thumbnail will set.

Media Section
INFO
You can upload more than one image in the Media section.
- To upload an image:
- Either click the dashed box and select images;
- Or drag-and-drop images in the dashed box.
- To delete image:
- Hover on the image, you will get to see 2 icons on top of the image.
- Click on X icon. It will delete that image.
- Then click the save button.
Save the Product
To save the product you can follow these steps:
- Eithe press the
Ctrl+Skeys on your keyboard to save the product. - Or click the
Save
button which is shown in a modal on top of the window to save the product and publish it.

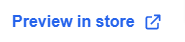
View Product in Storefront
To view a product’s details page on the storefront live:
- Go to the Product details page.
- Click on
Preview in Store
button, it will redirect to the product details page of the live storefront.
Edit a Product’s General Information
To edit a product’s general information:
- Go to the product’s details page.
- Click on the general although is pre selected.
- Edit any of the information in the form you want.
- Once done, click on the Save button.
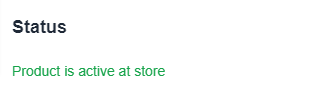
Product Status
Initially product status will be "inactive"
- After adding sell price or mrp and stock amount, the status will change into "active".
- Either you can add stock amount to the stock field or you can toggle the unlimited stock true.
Manage Product Options
To manage a product’s option:
Go to the product’s details page.
Click on the
Options
tab.Then click on
Add New Option
button.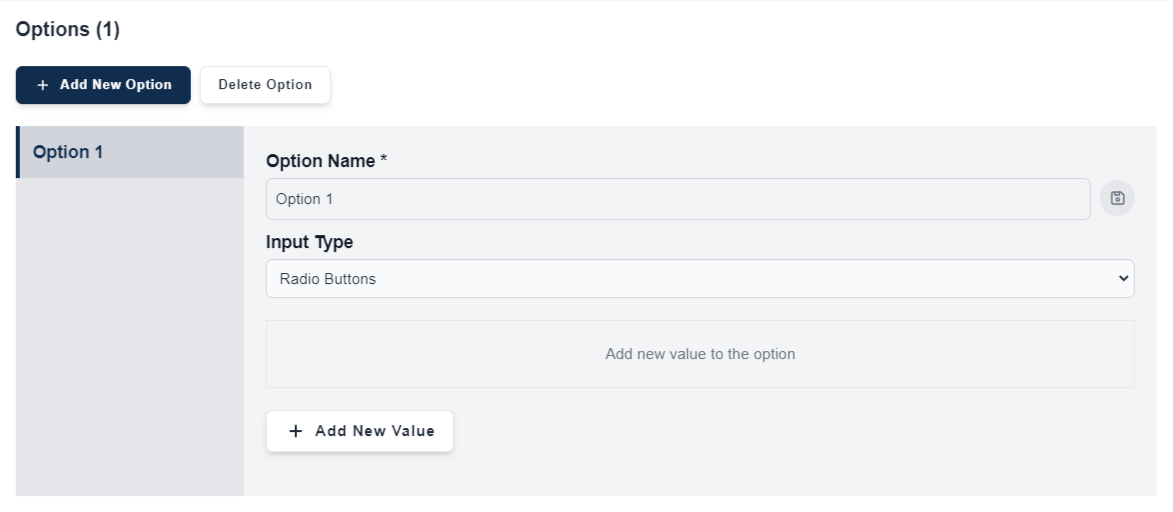
A new form will display:
- You can edit an option’s name just by updating the
Option Name
field. - You can change the type of input by choosing required type from the input type dropdown.
- You can delete an option by clicking the
Delete Option
button which is placed next toAdd New Option
button.

- You can edit an option’s name just by updating the
By clicking on
Add New Value
you can add multiple new values to the selected option.You can edit the option name.
After adding value you need to click the save button or you can remove that value by clicking delete button from action columb of the respected value row.
Once you’re done, click on the
Save Icon
which is placed next toOption Name
textbox.
Manage Images
INFO
You can upload more than one image for the product.
To manage a product’s images
- Go to the product’s details page.
- Click on the
Upload Image
button in theGeneral
tab. - You can upload image from your local storage.
- Another option is also available to add image or video link.
- Upon clicking
Add Image/Youtuve Link
button, a modal will open having a form.
- Once you’re done, click Save and close.
Duplicate a Product
To duplicate a product:
- Go to the Products page.
- Click on the icon next to the product you want to duplicate.
- Click on Duplicate from the dropdown.

This creates a product with the same information as the original but as a draft.
Delete a Product
WARNING
Deleting a product can’t be undone. You’ll lose all the product information.
To delete a product:
- Go to the Products page.
- Click on the icon next to the product you want to delete.
- Click on Delete from the dropdown.
- Confirm deleting the product by clicking the “Yes, confirm” button in the pop-up.
